This continuation from Part 1 explains how to complete the media upload process by obtaining a pre-signed URL, uploading your media to Sitecore, and publishing it to the Experience Edge. To see how to get the media file from a form and authorize your GraphQL API requests, please review Steps 1 & 2 in Part 1.
Step 3: Execute the “uploadMedia” Mutation to Get a Pre-Signed Upload URL
Step 4: Send a POST request to upload the media file to Sitecore using the URL from Step 3
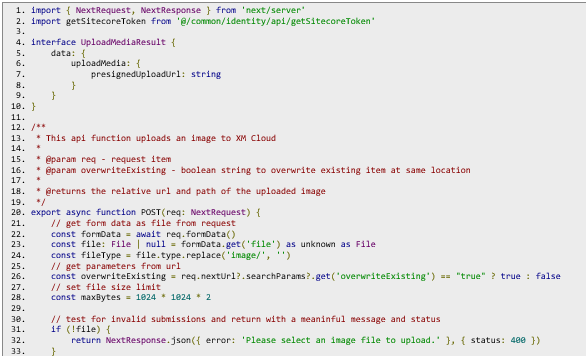
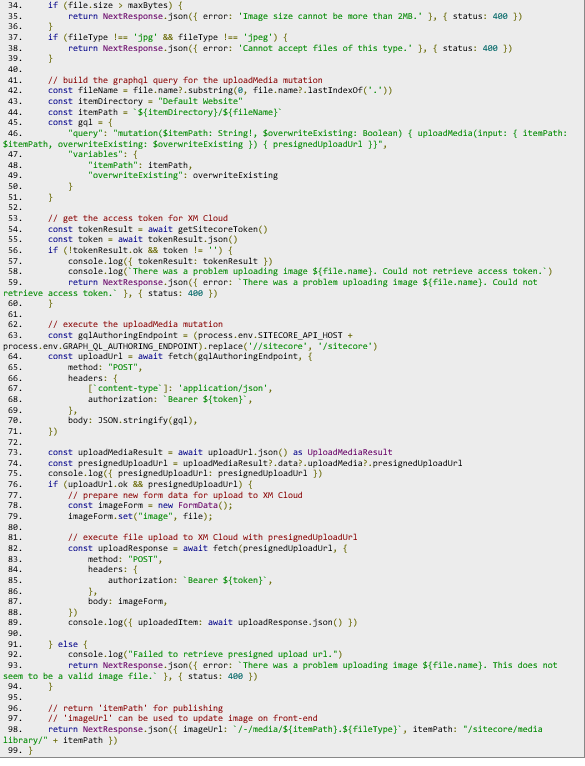
To handle media uploads, we’ll create a custom /upload API route that:
1. Validates the file and upload parameters.
2. Requests a pre-signed upload URL by executing the uploadMedia mutation.
3. Uses the pre-signed URL to upload the file to Sitecore
In this route, we’ll retrieve the file and parameters from the request. Before calling the mutation, we’ll validate the file (size and type) and get an access token using the getSitecoreToken() function created earlier.
Here’s the code to set up this /upload API route:


A successful response for the uploadMedia mutation will yield the following json:

A successful response when uploading the item to Sitecore will yield the following json:

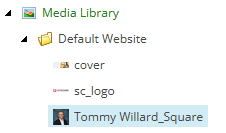
And now you should see the item in the media library

Troubleshooting Tip: If you get stuck try building and testing these HTTP requests in a tool like Postman so you can see what is going on at each step of the process.
Step 5: Execute the “publishItem” Mutation to Publish the New Media Item to the Experience Edge
Awesome! We’ve uploaded the media item to Sitecore XM Cloud, but it’s not visible on the website yet. To make it available, we’ll need to publish it. Fortunately, the Authoring and Management API provides a publishItem mutation for this exact purpose.
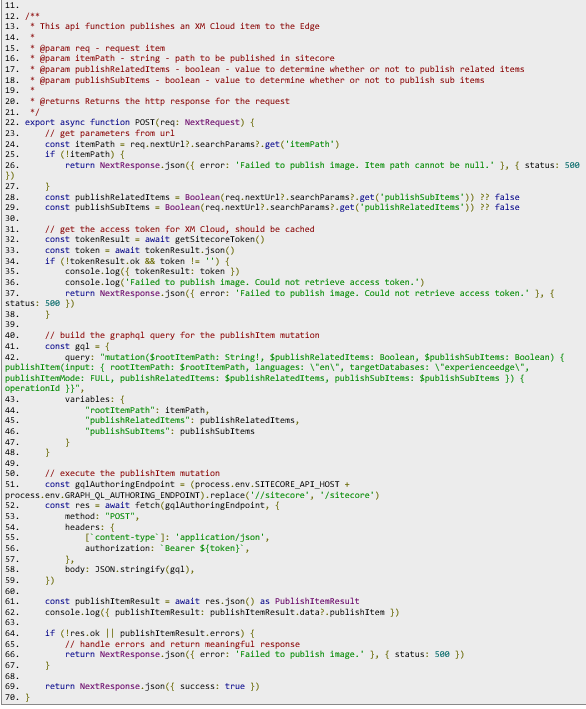
To publish the item, we’ll set up a new /publish API route. This route will:
1. Accept publishing parameters from the request URL.
2. Retrieve the access token from the cache.
3. Execute the publishItem mutation to publish the item.
If successful, this mutation will return an operationId, indicating that the item has been published and is now visible on the website.
Here’s the code for the /publish API route:


A successful response for the publishItem mutation will yield the following json:

And you will be able to see your published item on the website

Conclusion:
By following this guide, you’ve gained the tools to effectively upload and publish media items to XM Cloud using the Authoring and Management GraphQL API in a Next.js application. This approach enables developers to automate and simplify workflows for media management in XM Cloud. With a foundational understanding of integrating GraphQL mutations and creating custom API routes, you can extend these steps further to accommodate various content types and enhance your own implementations. Now you’re ready to bring more efficiency and power to your content management processes in XM Cloud.

