Introduction:
For developers using Next.js, XM Cloud’s Authoring and Management GraphQL API provides powerful capabilities for managing media assets directly within the cloud. This guide will walk you through the process of uploading images to XM Cloud and publishing them using this API.
The process will look like this:
Step 1. Create a form to capture the media file we want to upload
Step 2. Retrieve the JWT access token for our XM Cloud environment
Step 3. Execute the “uploadMedia” mutation to get a pre-signed upload URL
Step 4. Send a POST request to upload the media file to Sitecore using the URL from the previous step
Step 5. Execute the “publishItem” mutation to publish the new media item to the Experience Edge
In this article, we will cover steps 1 and 2 of the process. Steps 3 – 5 will be covered in Part 2
Step 1: Create a Form to Capture the Media File We Want to Upload
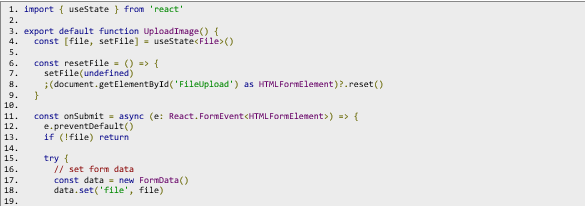
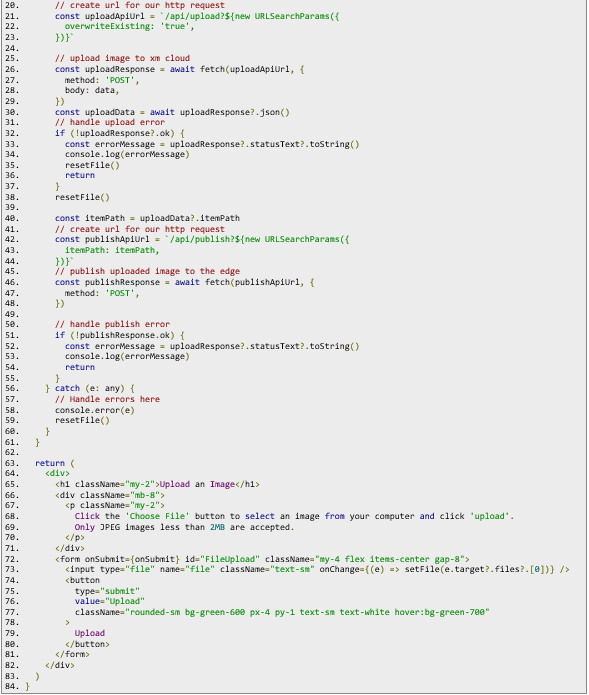
To get started, we’ll create a simple form to capture the media file we want to upload. This form will have a single file input and a submit button, keeping the focus on the upload and publishing logic rather than form design. Our main logic will happen in an onSubmit function, where we handle file upload and publishing.
Here's the form component:


The form should look similar to this when rendered
Overview of the Form and API Requests
1. File Input and Submit: The form allows users to select a file and submit it for upload.
2. Uploading: The onSubmit function triggers the /api/upload API, handling the file upload and returning an item path for the file.
3. Publishing: After a successful upload, we call the /api/publish API, which publishes the file.
In the next steps, we'll implement these API routes and obtain an access token to authorize our requests with XM Cloud.
Step 2: Retrieve the JWT Access Token for Our XM Cloud Environment
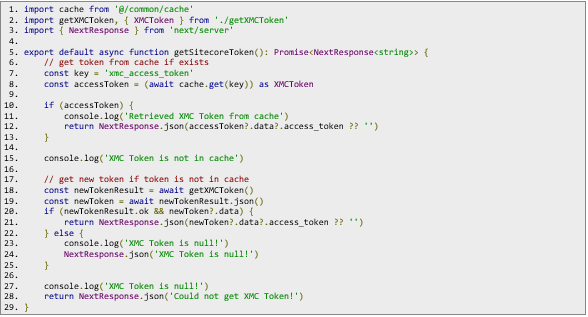
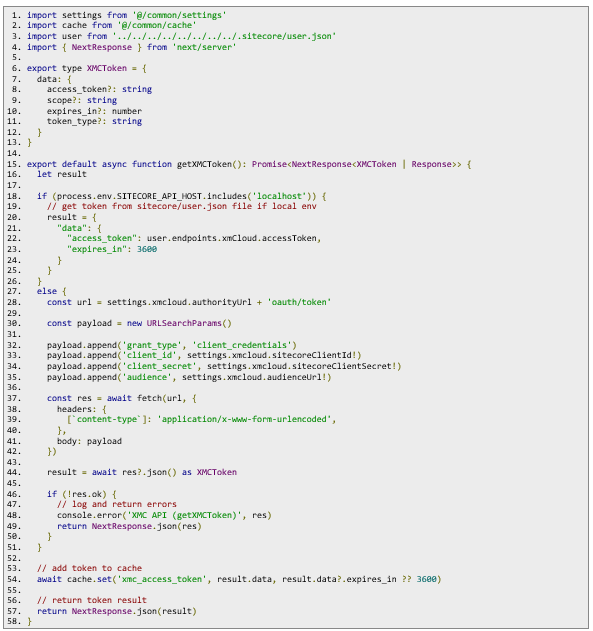
To minimize redundant requests, we’ll utilize caching to store our access token. A function will first check if a token is already cached; if not, we’ll retrieve a new one. The retrieval process differs based on the environment (local vs. non-local).
In a local environment, retrieve the accessToken from sitecore/user.json in your project. In a non-local environment, you’ll need to create an automation client with client_id and client_secret, saved as environment variables along with the following (more information here):
· AUTHORITY_URL = https://auth.sitecorecloud.io/
· AUDIENCE_URL = https://api.sitecorecloud.io
With these values set, we can create an HTTP POST request to retrieve a new access_token and store it in the cache.
Here’s the function to get a cached token or request a new one if needed:

In this function, we call getXMCToken() (line 18) to request a new token when the cache is empty. Here we define our return type, build our request, and fetch our access token. With a cached access token, our requests to the Authoring and Management GraphQL API are now authorized. In Part 2, we'll cover generating a pre-signed upload URL, uploading files to XM Cloud, and publishing media to the Experience Edge.

