

Integrating with a payment processor is often a major part of any e-commerce project. One of the options that you have available is Paymetric, which is a SaaS company that offers integrated, secure payment acceptance solution. At XCentium, one of our core specialties is CloudCraze and we specialize in customizing and delivering a high-quality e-commerce solution that allows our clients to integrate with any of their existing platforms to deliver a cohesive, seamless experience to their customers.
Within this post, I will go through and demonstrate how to integrate with Paymetric on the CloudCraze platform via a iFrame. Quick Note: when using the sample code from here, there are a few instances where you need to substitute in your credentials and specific information. They will be prepended and appended by --- .
I get it, we all have busy lives and busy days. It is hard to read through and entire blog post with our busy schedules. Lucky for you, here is the TL; DR
TL; DR I don t have time to read through the entire post
Steps:
- Create a Vf page to host the payment form with a custom controller
- Update CloudCraze Config Settings to use the VF page as the payment form
- Make a WebService call to Paymetric XiIntercept to get the Access Token with your credentialsUsing the Access Token, initiate the iFrame styling the form as you see fit
- Create a onSubmit Handler to do a remote call to the controller method
- Call Paymetric XiIntercept to get the Tokenized Credit Card Number
- Call Paymetric XiPay to do the complete the Sale
- Process the response and update CloudCraze with the transaction information
Ta-Da Let s go back to our busy lives (creating memes and posting them on social media)
The Good Stuff
*The post assumes that you have an intermediate to advanced familiarity with CloudCraze and Salesforce
Step 1:
The first step is to create a VF page to host the payment form with a custom controller. We recommend using a standard naming convention for better code quality.
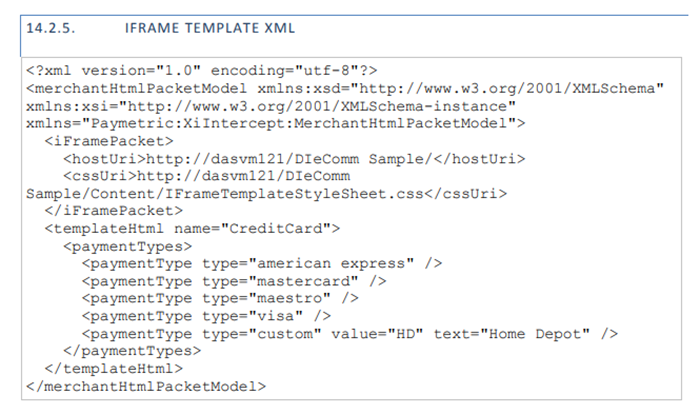
- Embed the XiFrameJS that enables the Paymetric iFrame/Ajax call using the following url (please refer to Paymetric Documentation for a up-to-date URL)
- https://prdapp02.xisecurenet.com/DIeComm/Scripts/XIPlugin/XIPlugin-1.1.0.js
Easy enough, right?
Step 2:
Next, we need to update CloudCraze to use our VF page for the credit card form:
1. Go to CC Admin > Configuration Modules and Create a new Configuration Module to hold the config metadata. Create the attributes as shown in the screenshot.
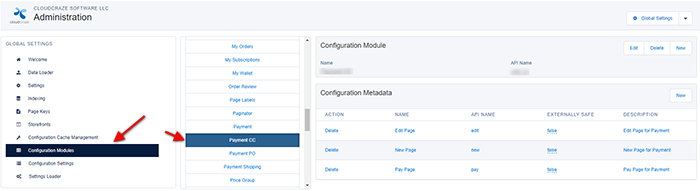
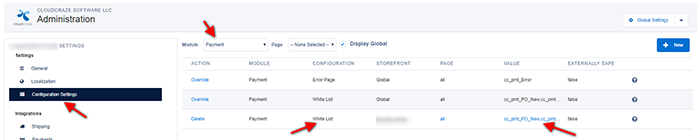
2. Go to the Storefront Settings that you are trying to configure Paymetric and Click on Configuration Settings > Payment Module and override the Whitelist Setting and add the custom VF page that you created previously.
3. Click on the new Config Module that you created previously and add the custom VF page that you created previously

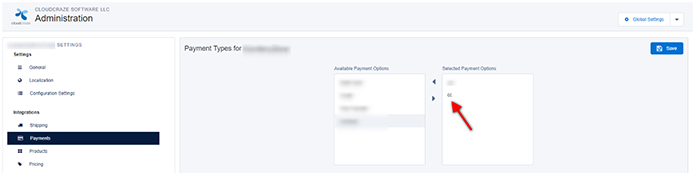
4. Add CC to the Payment Types in the Storefront Settings
Step 3:
Next we need to make a webservice call to Paymetric XiIntercept to initialize the iFrame
Create the XML payload to send the form fields required using the Paymetric iFrame documentation. You can utilize the standard XML or customize the XML to include the fields that you need (refer to the Paymetric Documentation for more information). Here is a sample payload:
2. Call the Paymetric XiIntercept to get the Access Token by passing in your credentials. See below for sample payload:
1. String signature = generateHmacSHA256Signature (secretKey, PacketXML); ?
2.
3. String payLoad = 'MerchantGuid=' + MerchantID +
4. '&SessionRequestType=' + SessionReqType +
5. '&Packet=' + EncodingUtil.urlEncode(PacketXML, 'UTF-8') +
6. '&Signature=' + EncodingUtil.urlEncode(signature, 'UTF-8') +
7. '&MerchantDevelopmentEnvironment=' + ?MerchantDevelopmentEnv ;
Make sure to generate the signature using the hmacSHA256 algorithm. See below for sample code:
1. private****static String generateHmacSHA256Signature(String saltValue, String packetXML) {
2. String algorithmName = 'hmacSHA256';
3. Blob hmacData = Crypto.generateMac(algorithmName, Blob.valueOf(packetXML), Blob.valueOf(saltValue));
4. return EncodingUtil.base64Encode(hmacData);
5. }
Using the access token returned in the response, embed the iframe on the VF page using the following URL format:
'https://' + hostname + '/DIEComm/view/iframe/' + MerchantGUID + '/' + accessToken + '/true';
Step 4:
Next we need to create a onSubmit Handler to do a remote call. See below for sample code
- var iframe = document.getElementsByName('dieCommFrame');
- if (iframe) {
- $XIFrame.submit({
- ?iFrameId: 'paymetricIFrame',
- ?targetUrl: iframe[0].getAttribute("src"),
- ?onSuccess: function (msg) {
- var message = JSON.parse(msg);
- if (message && message.data.HasPassed) {
- var remoteCall = _.extend(CCRZ.RemoteInvocation,{className: -----your controller class here----- });
- remoteCall.invokeCtx( -----custom method------,
- ?function(resp){
- //Handle Response from Paymetric to update CloudCraze
Step 5:
Next we need to call Paymetric XiIntercept to get the tokenized Credit Card Number. See below for sample code:
- HttpRequest req = new HttpRequest();
- req.setHeader('Content-Type', 'application/x-www-form-urlencoded');
- req.setHeader('Content-Length', '0');
- req.setMethod('GET');
- req.setEndpoint('https://' + hostName + '/DIEComm/ResponsePacket?MerchantGUID=' + MerchantGUID + '&Signature=' + signature + '&AccessToken=' + accessToken);
Parse the XML response to get the tokenized Credit Card Number
*Make sure you use the same signature and accessToken that you generated previously
Step 6:
Next we need to call Paymetric XiPay to get complete the sale. Couple of pointers here:
- Unfortunately, XiPay requires NTLM authentication and Salesforce doesn t support NTLM Authentication by default. However, this is where the open-source developer community comes to our support. Nate Wallace has created this excellent library which provides NTLM Auth enabled HTTP method. Please download and add this excellent library to SF: https://github.com/natewallace/ApexNTLM
- When passing in the Card Type, make sure you use the card type returned from the previous web service call and convert the string to uppercase before passing it to XiPay
- The sample code provided below only lists basic fields and is meant for an Authorization only. If you are doing a different operation, please refer to XiPay Documentation for additional fields that are required by your payment processor.
- See below for sample code: String XiPayXML = '';
- XiPayXML += '';
- XiPayXML += '';
- XiPayXML += '';
- XiPayXML += '';
- XiPayXML += '1';
- XiPayXML += 'false';
- XiPayXML += '';
- XiPayXML += '';
- XiPayXML += '' + cartAmount + '';
- XiPayXML += '' + cardSecurityCode + '';
- XiPayXML += '' + cardExpirationDate + '';
- XiPayXML += '' +cardDisplayName + ''; ?
- XiPayXML += '' + tokenizedCreditCardNumber + '';
- XiPayXML += '' + paymentType.toUpperCase() + '';
- XiPayXML += ' --YourMerchantID-- ';
- XiPayXML += 'E';
- XiPayXML += ' ---YourPacketOperation--- ';
- XiPayXML += '';
- XiPayXML += '';
- XiPayXML += '';
- XiPayXML += '';
- XiPayXML += '';
- XiPayXML += '';
- XiPayXML += '';
- String xiPayEndpoint = 'https://' + XiPay_HostName ;
- HttpClient httpObj = new HttpClient( --YourDomain-- \\' + --YourUserName--, -YourPWorSharedSecretKey-- ,True);
- HttpRequest Xireq = new HttpRequest();
- Xireq.setBody(XiPayXML);
- dataMap.put('XiPayXML', XiPayXML);
- Xireq.setMethod('POST');
- Xireq.setEndpoint(xiPayEndpoint);
- Map headerMap = new Map();
- headerMap.put('Content-Type','text/xml; charset=utf-8');
- headerMap.put('Content-Length', String.valueOf(XiPayXML.length()));
- HttpResponse xiResponse = httpObj.send(Xireq, headerMap);
Step 7:
Once you get a successful response from XiPay then, you can update CloudCraze with the payment information and the authorization codes.
- You need to create a new ccrz.cc_hk_Payment.TransactionPaymentParams object in your remote call and pass it back to VF as part of the response.
- In the TransactionPaymentParams object, you pass in the payment data per your data mapping strategy.
- In the VF Page, once you get the object you need to trigger the processPayment action using the TransactionPaymentParams object. See below for sample code:
- CCRZ.pubSub.trigger('action:processPayment', --YourTransactionPaymentParamsObject--);
At this point, you have successfully integrated Paymetric with CloudCraze via an iFrame. Even though this post specifically goes through the process with the iFrame, you can integrate with Paymetric via other options such as Form Post, Form Post with 3DS, Ajax, Hosted and AliPay. Please refer to Paymetric Documentation for further detatils.
Hope this post was helpful, if you have questions or comments about the post or if you need help configuring Paymetric Integration with CloudCraze or other CloudCraze customization, please reach out to us @ https://xcentium.com/contact and we would glad to chat!